

Earlier this year I decided to build a Chrome extension using React. Up until this point, I had been using React both professionally and for side projects so I thought I had enough experience to make the process and breeze. However, due to the intricate nature of how Chrome extensions worked and the lack of any good guides or documentation on how to build a Chrome extension using React, the process was painful, to say the least.
Simply put, most of the guides I’ve read online and here on Medium had a fundamental flaw: they didn’t go far enough. Sure there are tons of guides out there that will show you how to spin up an extension using Create React App or React + Parcel. But few go past the basics and cover the challenges every developer will face when building a Chrome extension in React. So this guide is for me 6 months ago. This is the guide I wish I had when I started on my journey of creating a Chrome extension in React.
In Part 1, we will cover the file structure and basic setup that you will need for an extension using React. In subsequent parts, I will cover Redux and Redux Persist Integration, hot reloading, and other Webpack tweaks specific to creating an extension using React.
Step 1: Initializing the Project
To start, create a directory for your new extension and run npm init inside to create a package.json file. Fill this information out as you normally would for any JS project. From there create a file structure that looks like this:
root_dir/
  static/           # static files
  chrome/           # chrome specific files
    icons/          # app icons
  app/              # JS files
To start, put your icons inside chrome/icons. You should include at least 3 icons of sizes 16x16, 48x48 and 128x128, you can learn more about the icons requirements here. If you don’t have any icons for your extension and just want to get off the ground quickly, you can use the icons in my boilerplate for now. Also feel free to change this file structure as you see fit as it’s not a hard fast rule, just keep these changes in mind.
Step 2: Install Required Packages
Before we start adding all the required files, we should go ahead and install all the core packages required. Below are all the packages you will need to get off the ground.
# Dependencies
react
react-dom

# Dev Dependencies
@babel/core
@babel/preset-env
@babel/preset-react
babel-loader
copy-webpack-plugin               # required to copy our icons
css-loader                        # loads our CSS with webpack
file-loader                       # loads any other assets
html-webpack-plugin               # generates our index.html
style-loader                      # also for loading CSS/styles
webpack
webpack-cli                       # required for using webpack
webpack-extension-manifest-plugin # generates our manifest
You can install these dependencies with two commands:
Dependencies:
yarn add react react-domDev Dependencies:
yarn add --dev @babel/core @babel/preset-env @babel/preset-react babel-loader copy-webpack-plugin css-loader file-loader html-webpack-plugin style-loader webpack webpack-cli webpack-extension-manifest-pluginStep 3: The Manifest
Now it’s time to start populating our directory structure. To start, create a manifest.json inside the chrome folder and populate the file with this:
{
  "manifest_version": 2,
  "name": "Your Extension's Name",
  "short_name": "Your Extensions 'Short Name'",
  "version": "1.0.0",
  "description": "Your extensions description",
  "icons": {
    "16": "icons/16.png",
    "48": "icons/48.png",
    "128": "icons/128.png"
  },
  "browser_action": {
    "default_title": "Chrome Extension Boilerplate",
    "default_popup": "index.html"
  },
  "permissions": []
}
Most everything in this manifest is pretty self-explanatory like the name, description, version, etc. Browser Action (browser_action) is what lets your chrome extension open a modal window when you click on it. At the bare minimum browser_action should have a default_title and default_popup which points to your index.html entry point (we will create this file in the next step). There are many many more things you can put into your manifest and I will cover several key things in subsequent parts of this guide. For now, this is all we will need.
Step 4: Static Files
Now it’s time to configure your static files. Inside your static folder, create an index.html, index.css and index.js file. Additionally, create a file called App.js inside the app folder in your projects root directory. Populate each with the respective starter below:
index.html
<!DOCTYPE html>
<html lang="en">
  <head>
    <link rel="manifest" href="<%= htmlWebpackPlugin.options.manifest %>" />
  </head>
  <body>
    <div id="root"></div>
  </body>
</html>
One crucially important line here is
<link rel=”manifest” href=”<%= htmlWebpackPlugin.options.manifest %>” />This will ensure that the manifest created by webpack is properly linked here. We could alternatively just make the href manifest.json, however, webpack is known for altering file names if you choose to hash them, and this makes sure that the right filename is always in place should you choose to enable hashing in your webpack configuration.
index.css
html,
body {
  height: 500px;
  width: 800px;
  margin: 0;
  padding: 0;
  overflow-x: hidden;
}
This one is pretty straightforward though note the height and width properties here control the dimensions of your extension’s popup window.
index.js
import React from "react";
import ReactDOM from "react-dom";
import App from "../app/App";
import "./index.css";

ReactDOM.render(<App />, document.querySelector("#root"));
Also pretty straightforward. Just make sure that the import statement for App is pointing to the right place (don’t worry, webpack will let you know immediately if the file path is incorrect).
App.js
import React, { Component } from 'react'class App extends React.Component {
  render() {
    return <h1>Hello World</h1>
  }
}

export default App
It’s not really that important what you put here, this will serve as your entry point for all of your JS assets in the app folder.
Step 5: Babel and Webpack
Babel is pretty straightforward. To start, create a .babelrc file in the root of your project directory and populate it with the following contents:
{
  "presets": ["@babel/preset-env", "@babel/preset-react"]
}
This configures babel to take in ENV presets and adds a basic react preset as well. You can configure this to your liking and include things like module resolver and classpath configurations just like in a web project.
Now on to Webpack…
I saved the best (or better yet complicated) for last. Webpack is a daunting plugin however I will do as much as I can to break it down and tell you everything that is going on. To start, create a webpack.js file in the root of your project directory and populate it with the following contents:
const path = require("path");
const HtmlWebpackPlugin = require("html-webpack-plugin");
const CopyPlugin = require("copy-webpack-plugin");
const baseManifest = require("./chrome/manifest.json");
const WebpackExtensionManifestPlugin = require("webpack-extension-manifest-plugin");

const config = {
  mode: "development",
  devtool: "cheap-module-source-map",
  entry: {
    app: path.join(__dirname, "./static/index.js"),
  },
  output: {
    path: path.resolve(__dirname, "./build"),
    filename: "[name].js",
  },
  resolve: {
    extensions: ["*", ".js"],
  },
  plugins: [
    new HtmlWebpackPlugin({
      title: "boilerplate", // change this to your app title
      meta: {
        charset: "utf-8",
        viewport: "width=device-width, initial-scale=1, shrink-to-fit=no",
        "theme-color": "#000000",
      },
      manifest: "manifest.json",
      filename: "index.html",
      template: "./static/index.html",
      hash: true,
    }),
    new CopyPlugin([
      {
        from: "chrome/icons",
        to: "icons",
      },
    ]),
    new WebpackExtensionManifestPlugin({
      config: {
        base: baseManifest,
      },
    }),
  ],
  module: {
    rules: [
      {
        test: /\.js$/,
        exclude: /node_modules/,
        use: ["babel-loader"],
      },
      {
        test: /\.css$/,
        use: ["style-loader", "css-loader"],
      },
      {
        test: /\.(png|svg|jpg|gif)$/,
        use: ["file-loader"],
      },
    ],
  },
};

module.exports = config;
The first two lines of your configuration are the mode (development or production) and devtool which controls how source maps are generated (source maps let you debug minified code more easily, you can read more about them here).
From there you have your entry and output blocks, in the entry block we define an entry point of app as the index.js file inside our static folder. The index.js file imports App, which presumably will import other components. At build time, webpack will follow that import tree, grab all the related JS files, and then bundle them.
Below the entry block, we have the output block. In the output block, we are telling webpack to bundle all of our files to a build folder in our current directory. Additionally, we are telling webpack that we want to follow the [name].js pattern so out output bundle should have the name app.js. Below entry and output we have a resolve block which just tells webpack to only look for and bundle files that end with js.
Now on to our plugins. The first plugin is our HTML webpack plugin which takes the base HTML file that we created in static, and then dynamically adds a title, meta and other info like links to our manifest file and generates this file at build time. The copy plugin is pretty simple, it just tells webpack to copy over our icons to the build folder at build time. Finally, our manifest plugin does basically the same thing as the HTML plugin but for our manifest, creating a manifest.json dynamically at build time and then adding it to our build folder at build time. You can achieve the same thing by adding an extra line to the copy plugin configuration to copy over the manifest, however, this plugin gives you some more control over what to put into the manifest which we will get to in subsequent parts.
Finally, we have our loaders, these loaders control the rules of how stuff should be bundled into our build bundle. It handles JS, CSS and image files.
AAAND FINISHED
When you’re all done your project root should look something like this:
project_root/
  package.json
  webpack.js
  .babelrc
  app/
   App.js
  chrome/
   manifest.json
   icons/
     16.png
     48.png
     128.png
  static/
    index.html
    index.js
    index.css
Before we run our project, there are some last minute things we should do. First off if you haven’t already run yarn you should, it will install all the packages you have referenced in your package.json . Lastly, add a script to the scripts block in your package.json:
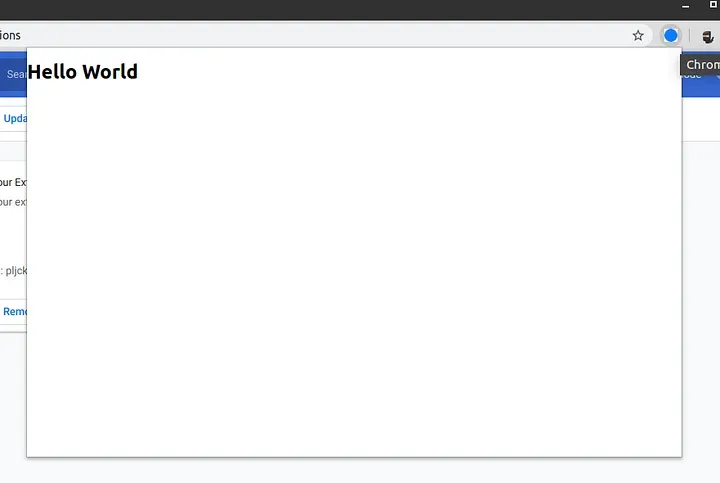
”dev”: “NODE_ENV=development webpack --mode development --config webpack.js --watch”This will let you run yarn dev and webpack will build your extension and bundle them into the build folder. Once you run yarn dev, open chrome and navigate to chrome://extensions, there toggle developer mode on the far right and then click “Load Unpacked Extension” on the left. When the window opens, select the build folder in your projects root directory. Your extension should load and look something like this:
That’s it! In Part 2 I will cover integrating Redux and Redux persist as well as getting Redux devtools to play nice with chrome extensions and properly storing your redux persist storage.
Cheers!